
Learn about layers and the "Free Transform" tool in Photoshop
Inside Photoshop:

Student Examples
Assignment:
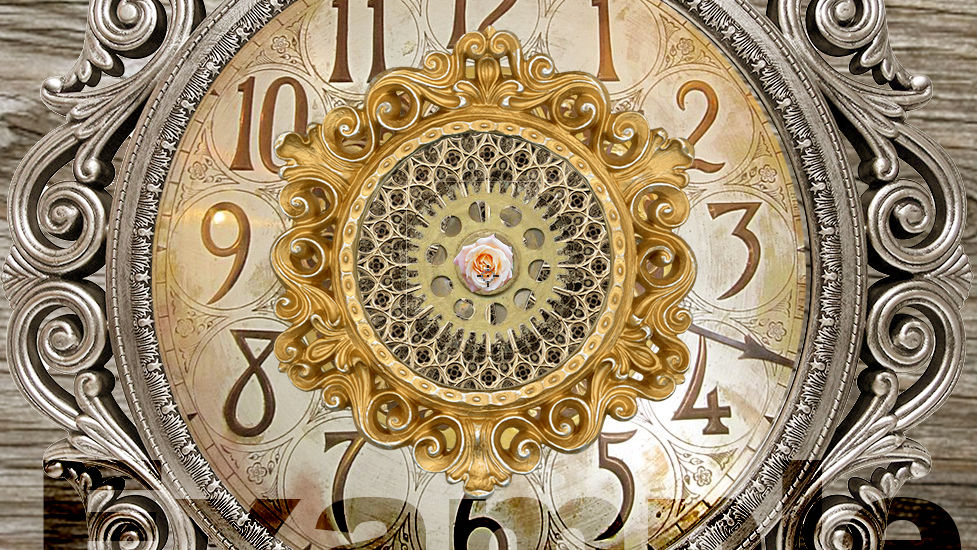
Create the clock above by layering the .PNG files below. Use the tutorials below to help you in your creations:
Adobe Photoshop (Macs & PCs only):
File>New>Create a new document that is:Art & Illustration> 1000 pixel grid>Create
File>Place Embedded>Each image (one at a time)
Adjust the stack in the Layers Panel so that each image appears in the proper order (see image above for reference)
Resize each image by using the "Free Transform" tool (Command/Control + T)
Grab a corner and hold both "Shift" and "Option" to resize each layerHolding "shift" Retains proportions
Holding "option" scales it around its center
Click the check (in the control panel) or hit "return/enter" (on the keyboard) to confirm transformation
Create a New Fill Layer (circular icon at the bottom of the layer panel)Pick "Solid Color"
Enter the hex code: c6ad8a and click ok
drag layer to the top of the stack (in the Layers Panel)
Change the blending mode (select the dropdown at the top of the layers panel titled "Normal")Choose Soft Light
When done Save
File>Save As>File Name: Last, Name_Mandala Clock
File Format: JPEG
Upload to Canvas
Photoshop Mix App (for Chromebook or Phone)
Start a New Project (click the + on the top right)
Create a "Custom Canvas"Title it: Last, First Name_Mandala Clock
Width: 1000 px
Height: 1000 px
Create a New Layerclick the "+" button on the right
Add an image
select image from camera roll
Choose an image (from the images below)
Rescale and position the image to match the example above
Adjust the stack in the Layers Panel (on the right) so that each image appears in the proper order (see image above for reference)You can move la
To rescale, click and drag on one of the blue corners
To move the image, click on the layer to select it and then drag the image to the desired location by first clicking and holding the layer and then repositioning the layer above or below
Make sure each layer is centered within the layer(s) beneath itAs you reposition each layer, a blue guide appears to let you know that the image is vertically or horizontally aligned. (A centered image will have both the vertical and horizontal blue lines appear.)
Repeat step 4 for each layer (image)
Create a New Layerclick the "+" button on the right
Add a color
Click the "Wheel" dropdown and choose RGB
Adjust the values of each channel as follows:Red (left column): 198
Green (center column): 173
Blue (right column): 138
click "done"
Select "Blend" (at the bottom)Choose "Soft Light"
Share (top right)
Upload to Canvas


